寫在前面: 本文試圖提醒您用電安全很重要,但請有興趣的玩家謹慎評估自身對強電的了解程度&可能的風險,再決定要不要製作。
本文所謂兩切開關,跟一般大家認知的雙切開關不同,個人覺得水電爸爸的影片跟這篇文章都很棒,建議大家都看看(省下我至少半個小時的打字,哈哈)
那市面上有沒有兩切開關可以買的呢? 有的,不過有點小醜、有點小貴,且非智能開關。
https://www.pcstore.com.tw/053701111/M01063205.htm
(網上隨便搜的,如有冒犯敬請通知移除)
先看原本改裝為智能兩切開關前,傳統兩切開關的樣子:
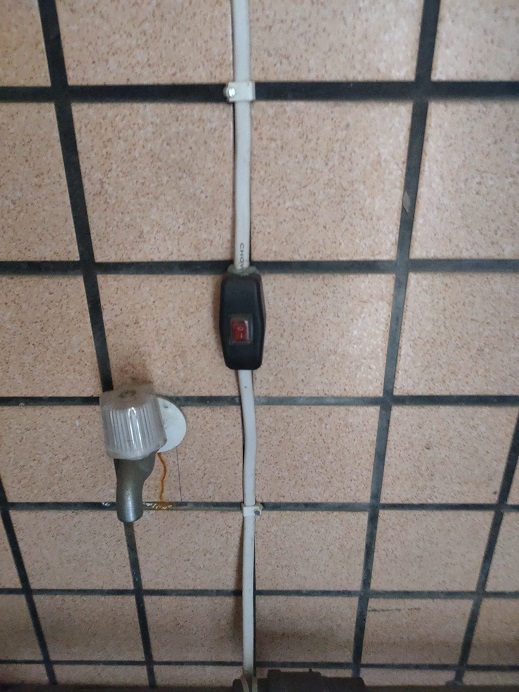
改裝後(盒子上除了開關按鈕之外我還多裝了顆人體紅外,正常可以省略):

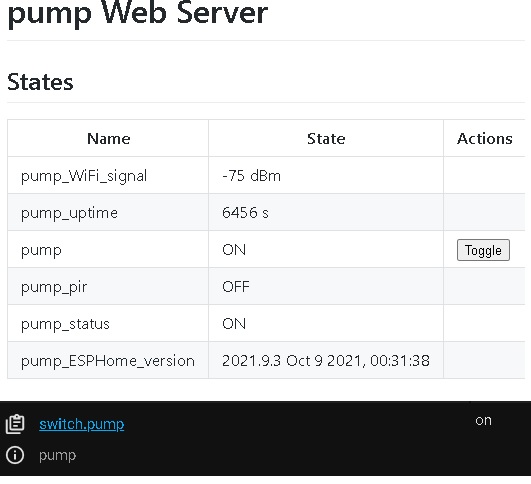
裝置網頁介面、及HA裡的開關,按鈕同時toggle兩個繼電器,也就是本文所說的兩切。
接下來進入正題,我故意只列材料清單及完整esphome的yaml,懂點電的人看了就會,不知從何下手的人建議就算了,我不想有人因為本文發生意外。
材料: nodemcu、ac-dc電源模塊、兩路繼電器、適合的外殼、微動開關、電線杜邦線若干
yaml: (初學者寫的不好,更好寫法或建議敬請不吝指教)
substitutions:
  device_name: pump #KQ400SIC變頻加壓馬達 #220V雙切智能開關

esphome:
  name: ${device_name}
  platform: ESP8266
  board: nodemcuv2

logger:

api:

ota:
  password: !secret wifi_pw

web_server:
  port: 80

wifi:
  ssid: !secret wifi_ssid
  password: !secret wifi_pw
  ap:
    ssid: "${device_name}_Fallback"
    password: !secret wifi_pw

captive_portal:

switch:
  - platform: gpio
    pin:
      number: D6
      inverted: true
    id: relay1
    restore_mode: always_off
  - platform: gpio
    pin:
      number: D7
      inverted: true
    id: relay2
    restore_mode: always_off
  - platform: template
    name: ${device_name}
    id: temp_switch
    turn_on_action:
      - then:
        - switch.turn_on: relay1
        - switch.turn_on: relay2
        - switch.template.publish:
            id: temp_switch
            state: on
    turn_off_action:
      - then:
        - switch.turn_off: relay1
        - switch.turn_off: relay2
        - switch.template.publish:
            id: temp_switch
            state: off

binary_sensor:
  - platform: gpio
    id: button
    pin:
      number: D4
      mode: INPUT_PULLUP
      inverted: True
    filters:
      - delayed_on: 30ms
      - delayed_off: 30ms
    on_click:
      - switch.toggle: relay1
      - switch.toggle: relay2
      - switch.template.publish:
          id: temp_switch
          state: !lambda 'return id(relay1).state;'
  - platform: status
    name: "${device_name}_status"

sensor:
  - platform: wifi_signal
    name: "${device_name}_WiFi_signal"
    update_interval: 60s

  - platform: uptime
    name: "${device_name}_uptime"

text_sensor:
  - platform: version
    name: "${device_name}_ESPHome_version"
PS: 為了不讓"正中"踢群,所有我DIY製作的裝置都可以丟到homekit去用,謝謝。