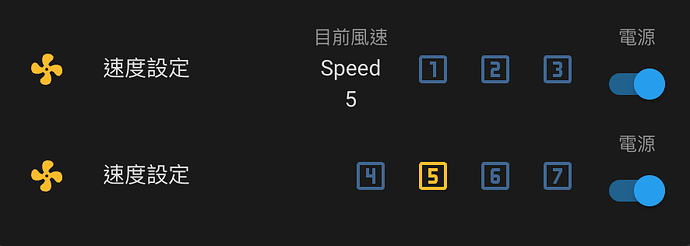
如題先上圖
使用計電量插座來算出目前風扇速度
在使用其他方式來設定你要調整的風速
前置作業
-
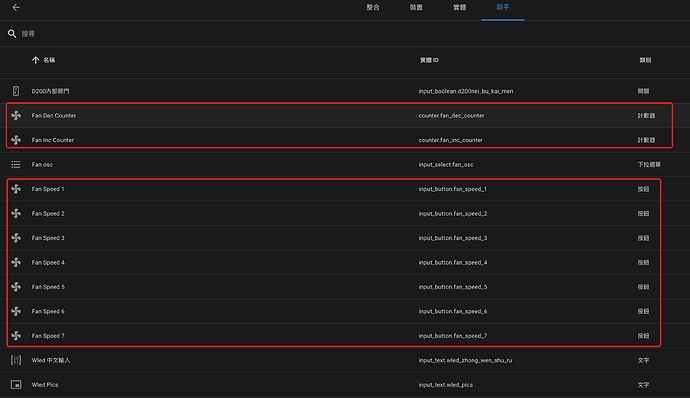
先到助手這邊新增幾個虛擬按鍵(虛擬按鍵數量依照你的風速去設定)以及2個計數器
以我的奇美風扇來說 風速有七段所以新增了7個風速按鈕 以及2個計數器
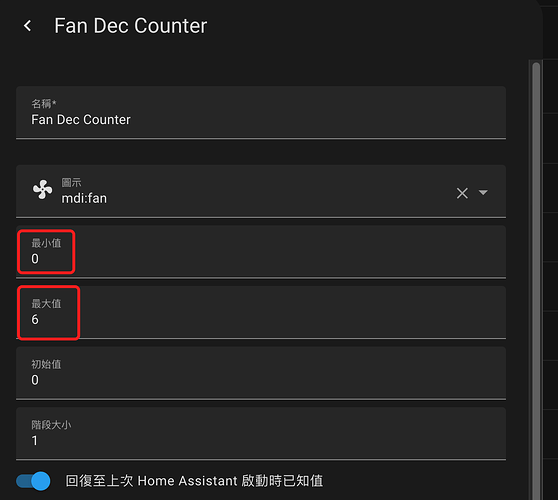
計數器請依照你的風速設定最小值為0 最大值為你的風扇段數-1
升速降速設定都一樣只有名稱不同而已 -
設定風扇的升降速腳本範例如下請依照你的實體調整yaml內容
至於要放哪邊依照你的習慣放置
script:
  fan_speed_up:
    sequence:
      - service: remote.send_command
        data:
          entity_id: remote.fang_jian_rm4c_mini2
          device: Chimei DF-14D601
          command: Speedup
  fan_speed_down:
    sequence:
      - service: remote.send_command
        data:
          entity_id: remote.fang_jian_rm4c_mini2
          device: Chimei DF-14D601
          command: Speeddown
- 使用 template 創建一個判斷目前風速的 sensor
範例如下
sensor:
  - platform: template
    sensors:
      fan_speed:
        friendly_name: "電風扇風速"
        value_template: >-
          {% set consumption = states('sensor.qi_mei_feng_shan_cha_zuo_current_consumption')|float %}
          {% if consumption == 0 %}
            Off
          {% elif consumption <= 2.1 %}
            Speed 1
          {% elif consumption <= 2.4 %}
            Speed 2
          {% elif consumption <= 4.0 %}
            Speed 3
          {% elif consumption <= 6.2 %}
            Speed 4
          {% elif consumption <= 12.8 %}
            Speed 5
          {% elif consumption <= 18.0 %}
            Speed 6
          {% elif consumption <= 23.5 %}
            Speed 7
          {% else %}
            Unknown
          {% endif %}
sensor.qi_mei_feng_shan_cha_zuo_current_consumption 替換成你的電量偵測插座功耗實體
範例中value_template:裏面的數字請依照你的風扇實際功耗去調整 不要直接套用我的數字不然會不準
到此前置作業都已經完成
開始NR的設定
函數主要的作用是判斷哪個按鈕被按下去然後依照目前的風速去產出要升降速的回圈數量並設定計數器
函數內容如下
const ha = global.get('homeassistant').homeAssistant;
const FanSpeedState = ha.states["sensor.fan_speed"].state;

const speedMatch = FanSpeedState.match(/\d+/);
let NowSpeed;

if (speedMatch) {
    NowSpeed = parseInt(speedMatch[0]);
} else {
    NowSpeed = 0;
}

var income_id;

if (msg.topic === "input_button.fan_speed_1") {
    income_id = 1;
} else if (msg.topic === "input_button.fan_speed_2") {
    income_id = 2;
} else if (msg.topic === "input_button.fan_speed_3") {
    income_id = 3;
} else if (msg.topic === "input_button.fan_speed_4") {
    income_id = 4;
} else if (msg.topic === "input_button.fan_speed_5") {
    income_id = 5;
} else if (msg.topic === "input_button.fan_speed_6") {
    income_id = 6;
} else if (msg.topic === "input_button.fan_speed_7") {
    income_id = 7;
} else {
    income_id = 0;
}

const setCount = NowSpeed - income_id;

if (setCount < 0) {
    const positiveSetCount = Math.abs(setCount);
    msg.payload_inc_count = { "value": positiveSetCount };
    msg.payload_dec_count = { "value": "0" };
} else if (setCount > 0) {
    msg.payload_dec_count = { "value": setCount };
    msg.payload_inc_count = { "value": "0" };
} else {
    msg.payload_inc_count = { "value": "0" };
    msg.payload_dec_count = { "value": "0" };
}

return msg;
input_button.fan_speed_? 請改成你設定的風扇速度按鈕實體ID
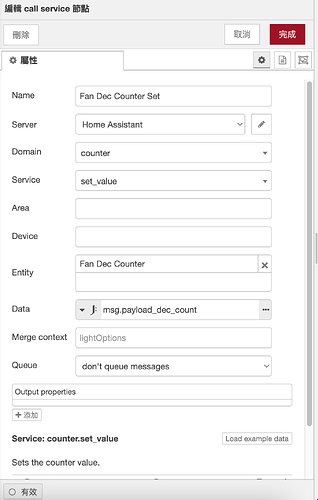
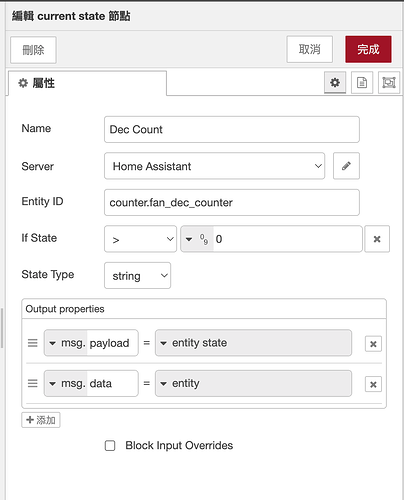
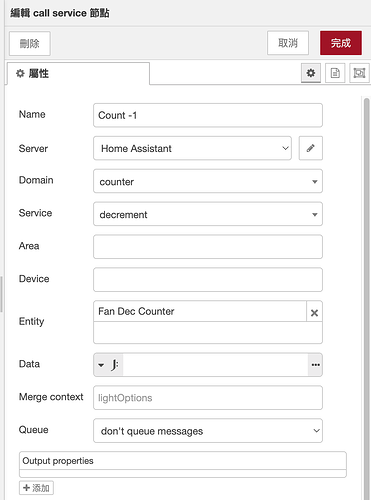
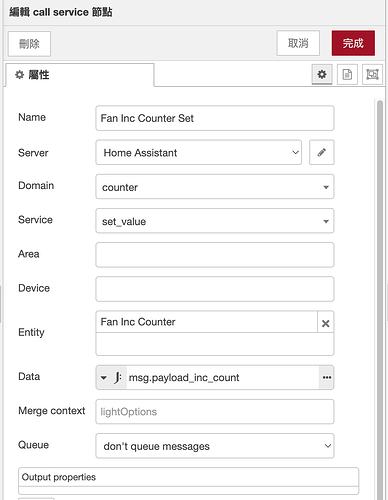
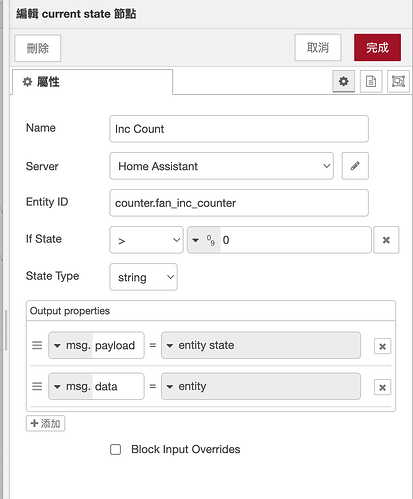
其他節點設定方式如下
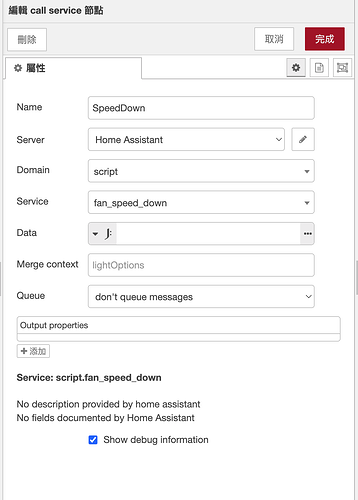
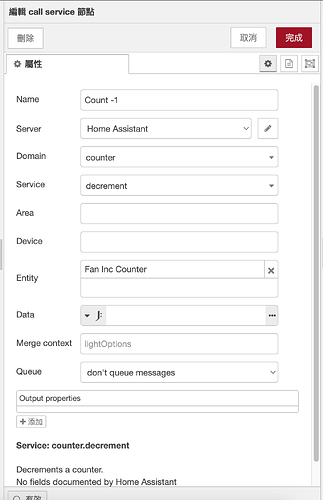
降速部分
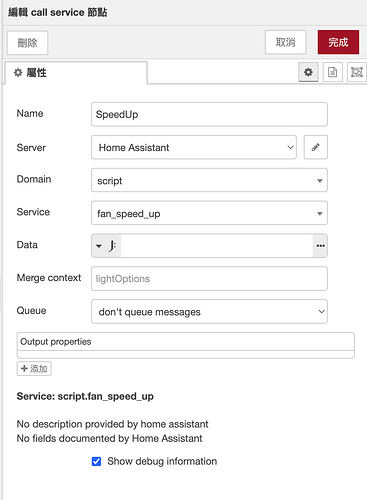
升速部分
面板的multiple-entity-row
  - entity: switch.qi_mei_feng_shan_cha_zuo
    type: custom:multiple-entity-row
    toggle: true
    name: 速度設定
    state_header: 電源
    state_color: true
    icon: mdi:fan
    entities:
      - entity: sensor.fan_speed
        name: 目前風速
      - icon: mdi:numeric-1-box-outline
        tap_action:
          action: call-service
          service: input_button.press
          service_data:
            entity_id: input_button.fan_speed_1
      - icon: mdi:numeric-2-box-outline
        tap_action:
          action: call-service
          service: input_button.press
          service_data:
            entity_id: input_button.fan_speed_2
      - icon: mdi:numeric-3-box-outline
        tap_action:
          action: call-service
          service: input_button.press
          service_data:
            entity_id: input_button.fan_speed_3
  - entity: switch.qi_mei_feng_shan_cha_zuo
    type: custom:multiple-entity-row
    toggle: true
    name: 速度設定
    state_header: 電源
    state_color: true
    icon: mdi:fan
    entities:
      - icon: mdi:numeric-4-box-outline
        tap_action:
          action: call-service
          service: input_button.press
          service_data:
            entity_id: input_button.fan_speed_4
      - icon: mdi:numeric-5-box-outline
        tap_action:
          action: call-service
          service: input_button.press
          service_data:
            entity_id: input_button.fan_speed_5
      - icon: mdi:numeric-6-box-outline
        tap_action:
          action: call-service
          service: input_button.press
          service_data:
            entity_id: input_button.fan_speed_6
      - icon: mdi:numeric-7-box-outline
        tap_action:
          action: call-service
          service: input_button.press
          service_data:
            entity_id: input_button.fan_speed_7
switch.qi_mei_feng_shan_cha_zuo 請改成你的風扇電源
以上為本次分享
希望能幫到有需要的朋友

