前言
Line Notify宣佈停用之後大家開始轉進其他通訊軟體來做通知,因不想再被第三方軟體限制,加上HA app本身的定位準確度搭配第三方的整合如icloud3較為準確,而轉進研究HA本身的通知系統,HA自身的Companion App通知功能很強大,但沒辦法留存紀錄導致無法查詢舊通知,使用上有一些缺陷,依賴ChatGPT實現了在dashboard上顯示通知歷程,廢話不多說正文開始
工作原理
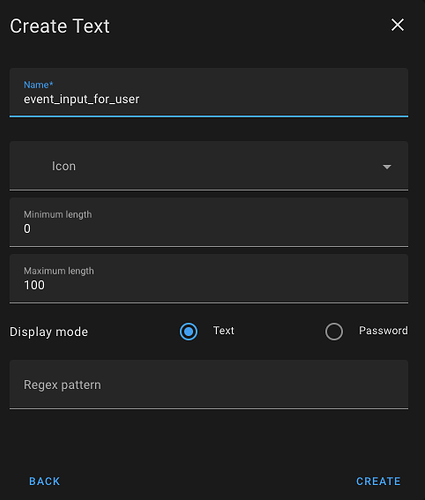
建立文字助手 ![]() 利用Shell command建立一個文字檔將通知訊息做保存
利用Shell command建立一個文字檔將通知訊息做保存 ![]() 建立自動化:當文字助手狀態變化,執行文字檔更新
建立自動化:當文字助手狀態變化,執行文字檔更新 ![]() 建立一個腳本將.txt內容轉成JSON格式並暫存系統
建立一個腳本將.txt內容轉成JSON格式並暫存系統![]() 建立一個command sensor將文字檔訊息導出
建立一個command sensor將文字檔訊息導出![]() 建立markdown card將command sensor訊息顯示出來
建立markdown card將command sensor訊息顯示出來
設定
-
建立文字助手
-
利用Shell command建立歷程文字檔(保留50則)
shell_command:
  #event_input correspond to the input_text.event_input
  prepend_event_log_user: >
    /bin/bash -c "
    echo -e '{{ event_input | replace('\n', '\\n') }}\n{{ now().strftime('%Y-%m-%d %H:%M:%S') }}\n' |
    cat - /config/www/event_log_user.txt |
    awk -v RS='' -v ORS='\n\n' 'BEGIN {count=0} {count++; if (count<=50) print}' > /config/www/event_log_user.tmp &&
    mv /config/www/event_log_user.tmp /config/www/event_log_user.txt"
- 歷程格式為{{ now().strftime(“%Y-%m-%d %H:%M”) }} - {{ event_input }},其中變數event_input後面會對應到{{ states(“input_text.event_input”) }}
- /config/www/event_log_user.txt 為文字檔儲存路徑
*count<=50 為要保存的最後50筆資料,可自行變更
- 建立自動化更新文字檔
alias: "Notification: Prepend Event to Log and Notify user"
description: ""
triggers:
  - entity_id:
      - input_text.event_input_for_user
    trigger: state
conditions:
  - condition: template
    value_template: "{{ states('input_text.event_input_for_user') | length > 0 }}"
actions:
  - data:
      event_input: "{{ states('input_text.event_input_for_user') }}"
    action: shell_command.prepend_event_log_user
  #此步驟是新增一個空白項目避免舊訊息反覆疊加
  - data:
      value: ""
    action: input_text.set_value
    enabled: true
    target:
      entity_id: input_text.event_input_for_user
- 建立腳本將txt文字轉成JSON
- 在config目錄下建立腳本“log_to_json_user.sh”
#!/bin/bash

# Get the current date and time
current_time=$(date +"%Y-%m-%d %H:%M:%S")

# Start the JSON output with the last update timestamp
echo '{ "last_update": "'"$current_time"'", "events": ['

# Initialize a flag to check if it's the first item
first_item=true

# Read the log file line by line
while read -r line; do
    # Check if the line is a timestamp (matches YYYY-MM-DD format)
    if [[ "$line" =~ ^[0-9]{4}-[0-9]{2}-[0-9]{2} ]]; then
        # Print the message and timestamp if both are available
        if [[ -n "$message" ]]; then
            # Escape double quotes in the message
            message=$(echo "$message" | sed 's/"/\\"/g')

            # If it's not the first item, add a comma
            if [ "$first_item" = false ]; then
                echo ","
            fi

            # Print the JSON object for the event
            echo "{\"message\": \"$message\", \"timestamp\": \"$line\"}"

            # Set the first_item flag to false after printing the first event
            first_item=false
        fi
        # Reset the message for the next event
        message=""
    else
        # Append the line to the message
        if [[ -n "$message" ]]; then
            message="$message\n$line"
        else
            message="$line"
        fi
    fi
done < /config/www/event_log_user.txt

# Close the JSON array and object
echo ']}'
- 至Terminal更改.sh檔案權限(注意檔案路徑)
chmod +x /config/www/log_to_json_user.sh
- Command Line sensor 搭配 “log_to_json_user.sh”
command_line:
  - sensor:
      name: Event Log user
      command: "bash /config/www/log_to_json_user.sh 2>&1" # Capture script errors too
      scan_interval: 5 # Run every 5 seconds
      value_template: "{{ value_json.last_update | default('Unknown') }}" # Use 'last_update' field or default to 'Unknown'
      json_attributes:
        - events # Store the events array as attributes
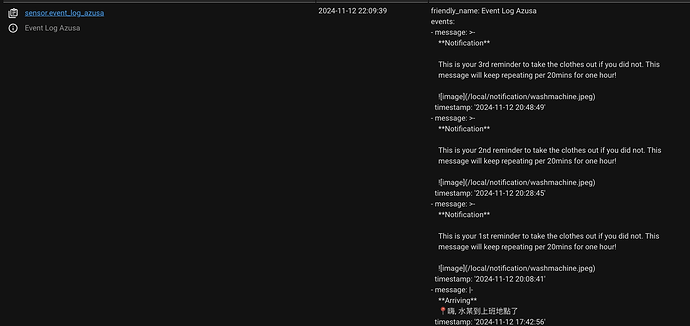
- HA sensor的state有字元數的限制,attributes的字元限制較高,要將txt的內容導入到command line sensor才可以完整顯示50則歷程,生成Entity如下
- 自動化連動通知和更新event_log_user.txt可參考進階設定的第二步驟,其中input text在輸入的時候務必確保有將每個項目換行,才會讓command line sensor的attributes變成條列式顯示,如上示意圖,這樣後面Markdown顯示出來才會是條列式的,這邊結露出來加強說明一下
- action: input_text.set_value
metadata: {}
data:
value: |
#在通知標題加上"unread"或"未讀",然後要讓event_log_user.txt的每條項目都換行,轉換成JSON格式才會對
**(unread){{ title }}**
{{ message }}

target:
entity_id:
- input_text.event_input_for_user
- 建立markdown card
  {% for event in state_attr('sensor.event_log_user', 'events') %}
  <ha-alert alert-type="info">{{ event.message }}
  ***{{ event.timestamp }}***</ha-alert>
  {% endfor %}
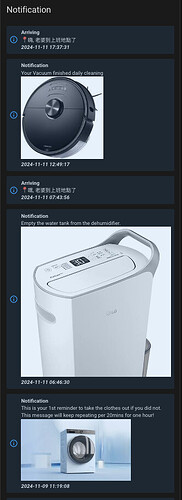
- 成果
進階設定
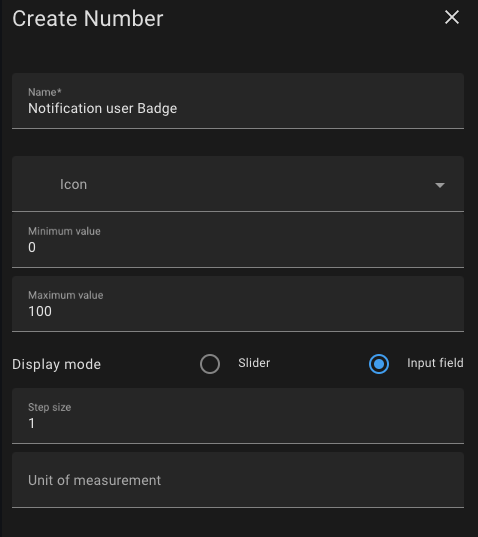
若要加上訊息讀取與否這邊可以增加兩個步驟:建立數字助手 ![]() 通知中的標題加上未讀字樣並且讓Companion App badge的未讀數字稱加
通知中的標題加上未讀字樣並且讓Companion App badge的未讀數字稱加 ![]() 利用Shell command清除未讀字樣
利用Shell command清除未讀字樣 ![]() 點開APP看完訊息後退到後台之後,消除未讀字樣
點開APP看完訊息後退到後台之後,消除未讀字樣
-
建立數字助手
-
通知自動化中的標題加上未讀字樣並且讓Companion App badge的未讀數字增加
這邊利用腳本的方式,方便做不同通知的的應用
alias: "Text: Log to Input and Notify"
sequence:
- action: input_number.increment
metadata: {}
data: {}
target:
entity_id:
- input_number.notification_user_badge
- parallel:
- action: notify.mobile_app_user
data:
title: "{{title}}"
message: "{{message}}"
data:
image: "{{image}}"
push:
interruption-level: "{{level}}"
#讓badge上疊加未讀訊息數量
badge: "{{ states('input_number.notification_user_badge') | int }}"
sound:
name: "{{sound}}"
volume: "{{volume}}"
tag: "{{tag}}"
- action: input_text.set_value
metadata: {}
data:
value: |
#在通知標題加上"unread"或"未讀",然後要讓event_log_user.txt的每條項目都換行,轉換成JSON格式才會對
**(unread){{ title }}**
{{ message }}

target:
entity_id:
- input_text.event_input_for_user
description: ""
icon: mdi:card-text-outline
- 建立Shell command清除未讀字樣
shell_command:
  refresh_event_log_user: "sed -i 's/ (unread)//g; s/(unread) //g; s/(unread)//g' /config/www/event_log_user.txt"
- 點開APP看完訊息後消除未讀字樣,Badge歸0
Companion App退到後台後會觸發對應的event,利用這點來達成此目的,對應event請參閱官方說明
#清除為讀字樣
alias: "Notification: Remove \"unread\" from user"
description: Mark the notification as read
triggers:
  - trigger: event
    event_type: ios.entered_background
    event_data:
      sourceDeviceID: YourDeviceID
    context:
      user_id:
        - YourUserID
conditions: []
actions:
  - action: shell_command.refresh_event_log_user
    data: {}
mode: single

#Badge歸0
alias: "Notification: Reset User Badge"
description: Badge number to "0"
triggers:
  - trigger: event
    event_type: ios.entered_background
    event_data:
      sourceDeviceID: YouDeviceID
    context:
      user_id:
        - YourUserID
conditions: []
actions:
  - action: input_number.set_value
    metadata: {}
    data:
      value: 0
    target:
      entity_id: input_number.notification_user_badge
mode: single
演示
- 通知action範例 - 利用步驟二的腳本完成所有步驟
alias: "Notification: Empty the water"
description: ""
triggers:
  - entity_id:
      - binary_sensor.lgdehumidifier_water_tank_full
    from: "off"
    to: "on"
    for:
      hours: 0
      minutes: 0
      seconds: 3
    trigger: state
conditions: []
actions:
  - variables:
      title: Notification
      message: |
        Empty the water tank from the dehumidifier.
      image: /local/notification/dehumidifier.jpg
      level: active
      sound: default
      volume: 0
      tag: notification
#呼叫第2步的腳本
  - action: script.text_log_to_input_and_notify
    data:
      title: "{{ title }}"
      message: "{{ message }}"
      image: "{{ image }}"
      level: "{{ level }}"
      sound: "{{ sound }}"
      volume: "{{ volume }}"
      tag: "{{ tag }}"
mode: single
.
總結
HA本身的File可以利用notify.send_message來自動生成歷程txt,但紀錄方式是最新的一筆在下方,而且是無限制的新增,應該也可以利用語法來更新這個txt,作法應該大同小異。
Companion APP的功能很多,也能直接做互動式訊息,本文是以iOS版本來撰寫,Android版本以及其餘功能應用請自行參考官方文件:https://companion.home-assistant.io/
本身非軟體專業,code或許可以在做優化,另外可以搭配自動化或Node Red流程將歷程自動更新,也可附加圖檔等markdown可支持的操作,本歷程為HA本地記錄,不限於其他通訊軟體應用,可並存。


